How to make a quick Payment Entry from the Payment Posting screen |
  
|
How to make a quick Payment Entry from the Payment Posting screen |
|
Now you can make a quick Payment Entry directly from the Payment Posting screen itself. There is no need to switch between Payment Entry and Payment Posting screens.
|
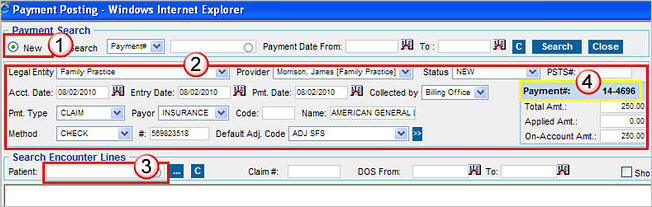
To make a quick Payment Entry from this screen , select the New option from the Payment area. |
|
Enter the payment related details (explained below). |
|
Click in the Patient box to save this payment entry. |
|
A payment number will automatically be assigned for this payment entry. |
1. To make a quick Payment Entry from this screen , select the New option from the Payment area.
2. Legal Entity and Status will already be selected by default; but it can be changed if required.
3. Click in the Provider box and select the Provider from the list.
PSTS# is the abbreviation for (FreeCHIRO Ticketing System). If you are using the ticketing system, enter the ticket number for this payment entry. This ticket number will be displayed as a link while editing payment entry. If you are logged in to the FreeCHIRO Ticketing System, you can click on this link to open the particular ticket and view the details/files pertaining to this payment entry.
|
5. Choose the Acct Date (Accounting Date), Entry Date and the Pmt Date (Payment Date)
|
6. Select the appropriate Collected by option i.e. Front Office or Billing Office.
7. Enter the amount received in the Total Amt box. The Applied Amt and On-Account Amt and will be updated according to the Payment Posting performed.
8. Click in the Pmt Type box and choose the correct payment type i.e. either REFUND/ COPAY/ DEDUCTIBLE/ PRE PAYMENT/ LIEN/ CLAIM/ COPAY/DEDUCTIBLE/SELF PAY etc.
9. Choose the correct Payor and enter the payor Code.
10. In the Name box, enter the first three letters of the payor to search for payor name. Select the payor name from the list that appears.
|
11. Click in the Method box and choose the method of payment from list. The details to be entered will vary according to the pay Method selected , see table below.
CASH |
Enter the Amount in the box provided. |
CHECK |
The check number is compulsory, enter the number in the Check # box. |
CREDIT CARD |
The credit card number is compulsory, enter the number in the Credit Card # box. |
EFT PAY |
EFT is the abbreviation for Electronic Funds Transfer. The card number is compulsory for EFT payments, enter the Card number in the # box. |
12. To save this payment entry, click in the Patient box in the Search Encounter Lines area. On clicking in the Patient box, the payment entry will be saved and a Payment# will automatically be allotted for this payment.
You can continue directly to payment posting now by selecting a Patient from this box.
